
自动扫描概述
SonarQube 是一款用于代码质量管理的开源工具,它主要用于管理源代码的质量。SonarQube 全自动化扫描,主要利用 Jenkins 检测 Git 代码更新,定时拉取代码,然后配合 oclint 及 SonarQube 实现自动化扫描展示。oclint 负责扫描项目,SonarQube 负责将扫描结果存储到数据库,并提供数据可视化。
主要步骤
- Jenkins 定时检测 Git 分支更新,并执行脚本(只有此操作使用 Jenkins,以下步骤使用脚本);
- 脚本检测本地是否已存在项目,不存在
git clone拉取代码,存在git pull拉取更新到本地; - 查找定位后缀为
.xcodeproj的工程文件,使用xcodebuild -list获取 Schemes 列表; - 使用 xcodebuild 清理工程缓存,并生成新的编译数据,使用 xcpretty 转成 json 格式;
- 使用 oclint 设置相关忽略项,并导出 oclint.xml 格式分析报告;
- 脚本动态生成 sonar-project.properties 文件,并调用 sonar-scanner 储存到数据库;
- 导出 ~/.jenkins/jobs/ 目录下的 config.xml 模板文件,脚本批量创建添加任务;
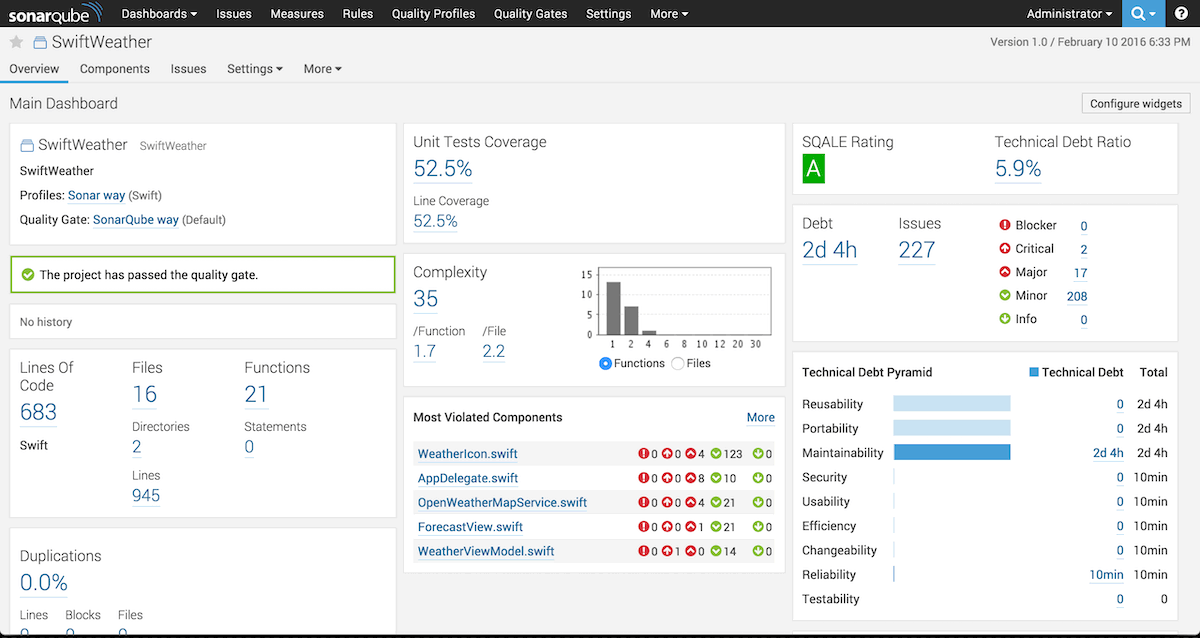
- 手动或 Jenkins 自动触发扫描,本机访问
http://localhost:9000查看结果。
安装流程
- 官网下载 dmg 安装 Java 8,Jenkins 依赖 Java 8,多版本可共存。
- 安装 Jenkins 和相关 Git 组件,brew 安装失败可迅雷下载替换,插件安装失败可换源换网。
- brew 安装 postgresql,并创建数据库名、表名、用户名和密码为 sonar 的数据库。
- 下载 sonarqube 实现可视化,放在 /opt 或其他目录下,配置 sonar.properties 文件。
- 下载 sonar-swift 三方插件,将插件放在 sonarqube 的 plugins 目录下。
- 安装 sonar-scanner 并配置 sonar-scanner.properties 文件的 URL 和编码。
- 配置 Jenkins 的 jobs 任务和 shell 运行。
Java 安装
访问 Java官网,并下载 Java 8 版本的 dmg 安装包,双击安装即可。注意,不要仅安装最新版本 JDK,Jenkins 要求 Java 8,如果需要可以同时安装多版本 Java。
若需要完全删除旧的 Java 版本,可执行下面的命令和操作。
sudo rm -fr /Library/Internet\ Plug-Ins/JavaAppletPlugin.plugin
sudo rm -fr /Library/PreferencePanes/JavaControlPanel.prefPane
sudo rm -fr ~/Library/Application\ Support/Oracle/Java
并在 /Library/Java/JavaVirtualMachines/ 目录下删除对应 Java 版本缓存。
Jenkins 安装
网络上安装教程很多,不再详细赘述,仅说明简要步骤。
- 使用 brew 安装简单,执行
brew install jenkins安装,终端执行jenkins启动; - 启动完成,浏览器输入
localhost:8080浏览,进入 Jenkins 管理网页; - 首次会提示输入初始密码,若无提示可在
~/.jenkins/secrets/initialAdminPassword路径找到; - 根据提示输入初始密码,并创建用户名和密码,例如选择账户名和密码都是 sonar;
- 在 Jenkins 系统设置-插件管理中,选择 Git 和 Xcode 等相关插件;
- 选择 新建-自由风格项目,按照提示配置 Git 和 Shell 脚本即可。
使用 brew 安装 Jenkins 失败,可手动安装,迅雷下载,手动复制到指定目录下。
- brew install xxxx 失败时返回对应 xxxx.tar.gz 的链接,迅雷下载;
- brew –cache 查看缓存(/Users/lif/Library/Caches/Homebrew);
- 点击任意链接,显示原身找到下载目录
~/Library/Caches/Homebrew/downloads/; - 将下载的 xxxx.tar.gz 拷贝到下载目录,名称命名为和 .tar.gz.incomplete 同样名称,去掉 .incomplete;
- 再次安装 brew install xxxx。
Jenkins 如果安装插件失败,可以更换安装源、手动上传、科学访问外网,更换网络。
- 更换安装源路径在 Jenkins 的管理网页中,系统设置-插件管理-高级-修改升级站点。 eg.安装源:http://mirror.esuni.jp/jenkins/updates/update-center.json
- 官网下载后缀 .hpi 插件文件,在系统设置-插件管理-高级-上传插件,选择下载的插件上传。 eg.Jenkins 插件官网:https://plugins.jenkins.io/
- 科学访问外网,可以选择科学访问外网下载。
- 下载失败也可能是连接网络的问题,我使用公司网络无论如何都是失败,使用手机分享 WiFi 下载成功。
Jenkins 启动停止
# 启动 jenkins,Ctrl + C 强制终止
jenkins
# brew 启动 jenkins 服务的方式(注意此操作可能会导致执行 Shell 存在用户权限问题)
brew services restart jenkins
# brew 停止 jenkins 服务的方式
brew services stop jenkins
注意:使用此方式启动可能导致执行 Shell 脚本失败,若失败可以在终端使用jenkins命令启动。
网页启动/停止/重启服务:
http://localhost:8080/exit //停止服务
http://localhost:8080/restart //重启服务
http://localhost:8080/reload // 重新载入服务
postgresql
sonarqube 默认数据库为 h2,用于测试,我们可以在 sonarqube 的安装目录 conf/sonar.properties 文件中找到支持的数据库的说明,postgresql 就是支持的一种。
The embedded H2 database is used by default. It is recommended for tests but not for production use. Supported databases are Oracle, PostgreSQL and Microsoft SQLServer.
# 安装
brew install postgresql
# 初始化,可省略
initdb /usr/local/var/postgres
# 启动服务
pg_ctl -D /usr/local/var/postgres -l /usr/local/var/postgres/server.log start
# 设置开机启动(此操作也可能会导致用户权限问题,导致 sonarqube 启动失败)
ln -sfv /usr/local/opt/postgresql/*.plist ~/Library/LaunchAgents
launchctl load ~/Library/LaunchAgents/homebrew.mxcl.postgresql.plist
# 给当前用户创建数据库,postgres 不会自动创建数据库,需手动创建
createdb
# 创建用户
CREATE USER sonar WITH PASSWORD 'sonar';
# 创建数据库
CREATE DATABASE sonar WITH OWNER sonar ENCODING 'UTF8';
# 给 sonar 用户添加创建数据库的属性
ALTER ROLE sonar CREATEDB;
# 测试当前用户
psql -U sonar -W
# 登录控制台
psql
# 删除数据库(备用)
DROP DATABASE sonar;
# 所有权及所有权转换(备用)
CREATE DATABASE sonar OWNER sonar;
GRANT ALL PRIVILEGES ON DATABASE sonar to sonar;
sonarqube
下载 sonarqube 源码到指定目录,例如可放在 /opt 或其他目录下,初始账号密码 admin。配置 conf/sonar.properties 文件中的数据库账号、密码和 URL。
sonar.jdbc.username=sonar
sonar.jdbc.password=sonar
sonar.jdbc.url=jdbc:postgresql://localhost/sonar
启动方式为执行安装目录下对应系统的 shell 文件,例如我的电脑为 Mac,sonarqube 放在 /opt 目录下,可以执行 bin 目录下的 macosx-universal-64/sonar.sh 脚本启动。注意 /opt 为 Mac 系统隐藏根目录,同时按 command shift = . 四个按键可以显示系统隐藏文件,再按一次隐藏系统隐藏文件。
# 启动 sonarqube
sh /opt/sonarqube/bin/macosx-universal-64/sonar.sh start
# 如果执行 shell 存在权限问题,可使用 chmod 777 获取对应文件或目录系统权限
chmod 777 /opt/sonarqube/bin/macosx-universal-64/sonar.sh
# 获取目录 /opt 系统权限
sudo chmod -R 777 /opt
安装 sonar-swift 插件
由于 sonarqube 的 ObjectiveC 插件收费,使用三方插件sonar-swift,并按照官方文档安装相关插件,将下载的 .jar 包放在 sonarqube的 extensions/plugins 目录下。旧版插件 sonar-objective-c 已不支持最新版 sonarqube,而 sonar-swift 同时支持 swift 和 objective-c。
sonar-swift 要求安装的插件较多,可以选择安装 sonar-scanner,oclint 和 xcpretty。
brew install swiftlint
brew install tailor
brew install sonar-scanner
# 安装 oclint
brew tap oclint/formulae
brew install oclint
# 更新 oclint
brew update
brew upgrade oclint
sudo gem install xcpretty
sudo gem install slather
sudo pip install lizard
sonar-scanner 安装完成后需要配置一下,终端输入where sonar-scanner,找到安装路径(/usr/local/Cellar/sonar-scanner/),在目录下找到配置文件 sonar-scanner.properties,配置扫描结果上传地址和编码。
# sonar-scanner 扫描结果上传地址(sonarqube 地址为 http://localhost:9000)
sonar.host.url=http://localhost:9000
# 编码格式
sonar.sourceEncoding=UTF-8
启动扫描
所有插件已安装完毕,可以执行 sonar-scan 进行
# 启动postgres服务
pg_ctl -D /usr/local/var/postgres -l /usr/local/var/postgres/server.log start
# 启动 Jenkins
brew services start jenkins
# 启动 sonar
chmod 777 /opt/sonarqube/bin/macosx-universal-64/sonar.sh
sh /opt/sonarqube/bin/macosx-universal-64/sonar.sh start
# Jenkins 执行的脚本,自动拉取分支代码,分析,上传 sonar,传入本地仓库地址和 Git 地址即可
/usr/bin/python /Users/lf/Documents/auto-scanner/auto-sonar.py publicplugingoup/gbcheckup.git
原理很简单,创建一个 jenkins 任务,定时检查更新,如果有更新,就执行脚本去拉取代码,并扫描上传结果。
例如需要将所有分支保存到当前用户桌面的 Git 文件夹下,那仓库路径就是~/Desktop/Git,分支的 Git 地址为 http://192.168.1.88/app/mybranch.git,可手动执行脚本下载扫描。
/usr/bin/python /Users/lf/Documents/auto-scanner/auto-sonar.py publicplugingoup/gbcheckup.git
自动化扫描
完成上面我们可以手动执行为每个仓库进行扫描,那如何做到如下自动化要求:
- 批量为每个组件创建 Jenkins 任务,并定时检测 Git 更新,若更新则自动扫描;
- 使用脚本自动从 Git 拉取组件源码,若已拉取则检查更新组件代码;
- 自动查找定位项目 project 文件及项目 scheme,自动进行逐个扫描;
- 自动创建 Sonar 配置文件,扫描结果自动储存到数据库,通过网页查看结果。
批量创建 Jenkins 任务,我们通过脚本一次性批量创建即可;检测更新我们可以通过 Jenkins 定时任务去执行;自动拉取最新代码和查找 scheme 进行扫描,我们在定时任务的脚本中执行即可。
Jenkins 批量创建任务
若组件很多,逐个手动创建 Jenkins 任务,显然不符合程序员的风格,我们需要批量自动创建。假设我们的组件 Git 地址都是这样的
http://192.168.1.44/publicrepos/demo1.git
http://192.168.1.44/publicrepos/demo2.git
http://192.168.1.44/publicrepos/demo3.git
http://192.168.1.44/publicrepos/demo3.git
我们为分支 http://192.168.1.44/publicrepos/demo1.git 创建一个 Jenkins 的任务,这时我们会发现 ~/.jenkins/jobs/ 目录下多了 demo1 文件夹,里面 config.xml 文件,这就是 Jenkins 任务的配置。
通过对比我们发现,只要修改一下 Git 地址和传入脚本的分支名称就可以了。我们可以为每一个组件复制一份 xml 文档,并修改 Git 地址和传入脚本的参数,复制到 Mac 端 Jenkins 的任务 jobs 路径 ~/.jenkins/jobs/ 下既可。
<?xml version='1.1' encoding='UTF-8'?>
<project>
  <!-- ......... 省略部分 ........ -->
  <scm class="hudson.plugins.git.GitSCM" plugin="git@4.0.0">
    <configVersion>2</configVersion>
    <userRemoteConfigs>
      <hudson.plugins.git.UserRemoteConfig>
        <!-- 组件的 Git 地址 -->
        <url>http://192.168.1.44/publicrepos/demo1.git</url>
        <credentialsId>31be0ffe-2c75-4183-9ab9-fd997a0942ea</credentialsId>
      </hudson.plugins.git.UserRemoteConfig>
    </userRemoteConfigs>
  </scm>
  <builders>
    <hudson.tasks.Shell>
      <!-- 我们配置的执行 Shell 脚本命令 -->
      <command>/usr/bin/python /Users/pk/Documents/auto-scanner/auto-sonar.py publicplugingoup/basemapcomponent.git</command>
    </hudson.tasks.Shell>
  </builders>
</project>
批量为每个组件创建 Jenkins 任务脚本
#!/usr/bin/env python
# coding=UTF-8

'''
g_old_branch 创建的模板文件 config.xml 中需要替换的分支名称
g_old_time 创建的模板文件 config.xml 中需要替换的触发时间
git_links.txt 组件的 Git 地址,逐行分开
config.xml 手动创建的一个 Jenkins 任务当做模板
批量创建完成结果在当前脚本的 xmls 文件夹下
'''

g_old_branch = "publicplugingoup/basemapcomponent"
g_old_time = "H(0-29)/19 * * * *"

import os, re

# 从URL获取分支名称,eg. [publicplugingoup, basemapcomponent]
def get_branch(link):
    link_list = link.split('/')
    if len(link_list) < 2:
        return []
    branch_name_git = link_list[-1]
    branch_group = link_list[-2]
    branch_name = branch_name_git.split('.')[0]
    return [branch_group, branch_name]

# 逐行读取文件中的链接
def read_txt(txt_path):
    links_list = [] # 储存行
    for line in open(txt_path):
        line = line.strip('\n')
        if line != "":
            links_list.append(line)
    return links_list

# 根据当前索引顺序算出下一个时间,索引、时间步长、起始小时,起始分钟
def get_scm_time(index, step, start_hour, start_minute):
    next_hour = ((start_hour * 60 + start_minute + step * index)%1440)/60 # 小时
    begin_minute = (step * index)%60
    next_minute = begin_minute + step - 1
    if next_minute > 59:
        begin_minute = 0
        next_minute = step
    next_time = "H(" + str(begin_minute) + "-" +str(next_minute) + ") " + str(next_hour) + " * * *"
    return next_time

 # 创建 config.xml 文件,传入链接列表,创建文件的保存路径, config.xml 文件路径
def create_xml(links_list, xmls_folder, config_path):
    config_lines = [] # 储存行
    for line in open(config_path):
        config_lines.append(line)
    # 遍历链接列表
    for index, link in enumerate(links_list):
        branch_group_name = get_branch(link)
        if len(branch_group_name) < 2:
            print("链接无效:" + link)
            continue
        branch_group = branch_group_name[0] # 分组名
        branch_name = branch_group_name[1] # 分支名称
        # 创建文件保存到以分支名命名的文件夹中
        branch_folder = xmls_folder + "/" + branch_name
        if not os.path.exists(branch_folder):
            os.system('mkdir ' + branch_folder)
        else:
            os.system('rm -rf ' + branch_folder)
        config_xml_path = branch_folder + "/config.xml"
        # 获取下一个运行的时间, 时间从0点0分开始,每10分钟运行一个组件
        new_time = get_scm_time(index, 10, 0, 0)
        config_copy = []
        for cg_line in config_lines:
            temp_line = cg_line
            if g_old_branch in temp_line:
                temp_line = temp_line.replace(g_old_branch, branch_group + "/" +branch_name)
            if g_old_time in temp_line:
                temp_line = temp_line.replace(g_old_time, new_time)
            config_copy.append(temp_line)
        xml_str = "".join(config_copy)
        with open(config_xml_path, 'w+') as f:
            f.write(xml_str)
        print("已创建" + str(index) + ":" + branch_group + "/" + branch_name + new_time)

# main
if __name__ == "__main__":
    xmls_folder = os.path.dirname(os.path.abspath(__file__)) + "/xmls"
    if os.path.exists(xmls_folder):
        os.system('rm -rf ' + xmls_folder)
    os.system('mkdir ' + xmls_folder)
    links_path = os.path.dirname(os.path.abspath(__file__))+ "/git_links.txt"
    links_list = read_txt(links_path)
    config_path = os.path.dirname(os.path.abspath(__file__))+ "/config.xml"
    create_xml(links_list, xmls_folder, config_path)
查找 xcodeproj 和 Scheme 脚本
定时检测 Git 更新,使用脚本自动从 Git 拉取组件源码;自动查找定位项目 project 文件及项目 scheme,自动进行逐个扫描。
#!/usr/bin/env python
# coding=UTF-8

'''
g_repos_folder 下拉代码,存放组件代码的路径
'''

g_repos_folder = "/Desktop/GitJH"

import sys, os, platform

# 找到 xcodeproj 工程文件
def find_project(branch_dir):
    proj_path = ""
    for home, dirs, files in os.walk(branch_dir):
        for temp_dir in dirs:
            name_array = os.path.splitext(temp_dir)
            if len(name_array) < 2:
                continue
            file_suffix = name_array[1] # 获取后缀
            if file_suffix.lower() == ".xcodeproj":
                proj_path = os.path.join(home, temp_dir)
                break
    return proj_path

# 获取所有scheme
def get_schemes(proj_path):
    proj_folder = os.path.dirname(proj_path)
    xcodebuild_list = os.popen('cd ' + proj_folder + ' && xcodebuild -list')
    scheme_list = []
    sch_flag = False # 标记找到Scheme
    for line in xcodebuild_list:
        temp_line = line.strip()
        if "Schemes:" in temp_line:
            sch_flag = True
            continue
        if sch_flag == True and temp_line != "" and not temp_line.lower().endswith("bundle") and not " " in temp_line:
            scheme_list.append(temp_line)
        if temp_line == "":
            sch_flag = False
    return scheme_list

# 自动拉取分支
def git_clone(argv_list, branch_dir):
    branch_group = argv_list[0] # 参数1 分组名称
    branch_name = argv_list[1] # 参数2 分支名称
    branch_path = branch_dir + "/" + branch_name
    # http://192.168.1.44/publicrepos/demo1.git
    branch_link = "http://192.168.1.44/" + branch_group + "/" + branch_name  + ".git"
    git_pwd = "cd " + branch_dir +" && git clone " + branch_link
    if os.path.exists(branch_path):
        git_pwd = "cd " + branch_path +" && git pull origin master"
    os.system(git_pwd)
    print("拉取:" + branch_name)

# 自动化 sonar 扫描
def auto_sonar(argvs):
    argv_list = argvs[:-4].split("/")
    if len(argv_list) < 2:
        print("Python 参数错误")
        return
    branch_name = argv_list[1]
    # 分支绝对路径
    branch_dir = os.path.expanduser('~') + g_repos_folder
    branch_path = branch_dir + "/" + branch_name
    print("分支路径:" + branch_path)
    # 拉取或者clone分支
    git_clone(argv_list, branch_dir)
    # 找到工程文件
    proj_path = find_project(branch_path)
    print("工程路径:" + proj_path)
    # 找到所有scheme
    scheme_list = get_schemes(proj_path)
    print("scheme 列表:" + str(scheme_list))
    # shell 参数,参数1:分支名称;参数2:xcodeproj 文件全路径;参数3:scheme
    for scheme in scheme_list:
        sh_path = os.path.dirname(os.path.abspath(__file__)) + '/run-sonar.sh'
        os.system("chmod 777 " + sh_path)
        sonar_pwd = 'sh '+ sh_path + ' ' + branch_name + ' ' + proj_path + ' ' + scheme
        os.system(sonar_pwd)

# 主程序
if __name__ == "__main__":
    if len(sys.argv) < 2:
        print("python 参数必须带上 分组/分支名称")
        sys.exit(0)
    else:
        auto_sonar(str(sys.argv[1]))
OCLint 扫描上传 SonarQube 脚本
自动创建 Sonar 配置文件,扫描结果自动储存到数据库,通过网页查看结果。
#!/bin/sh

# 检测参数
if [ -z "$1" ]; then
    echo "参数1:分支名称不能为空"
    exit 0
fi
echo "参数1:"$1

if [ -z "$2" ]; then
    echo "参数2:xcodeproj 文件路径不能为空"
    exit 0
fi
echo "参数2:"$2

if [ -z "$3" ]; then
    echo "参数3:scheme 名称不能为空"
    exit 0
fi
echo "参数3:"$3

# 检测环境
if which xcodebuild 2>/dev/null; then
    echo 'xcodebuild exist'
else
    echo 'xcodebuild 未安装'
fi

if which oclint 2>/dev/null; then
    echo 'oclint exist'
else
    echo 'oclint 未安装'
    exit 0
fi

if which xcpretty 2>/dev/null; then
    echo 'xcpretty exist'
else
    echo 'xcpretty 未安装,执行 gem install xcpretty 安装'
    exit 0
fi

# 获取路径和scheme
proj_dir=$(dirname "$2")
cd "$proj_dir" || exit 0
echo "工程路径:"$proj_dir

# 清除上次的缓存
if [ -d ./derivedData ]; then
    echo "清理缓存..."
    rm -rf ./derivedData
fi

myworkspace=$(basename "$2")
myscheme="$3"

# xcodebuild clean
xcodebuild clean -project "$myworkspace" -scheme "$myscheme" -sdk iphoneos -configuration Debug

# 生成编译数据
xcodebuild -project "$myworkspace" -scheme "$myscheme" -sdk iphoneos -configuration Debug \
arch=arm64 COMPILER_INDEX_STORE_ENABLE=NO | xcpretty -r json-compilation-database -o compile_commands.json

if [ -f ./compile_commands.json ]; then
    echo "编译数据生成完毕"
else
    echo "编译数据生成失败"
    exit 0
fi

# 生成报告目录
if [ ! -d ./sonar-reports ]; then
    mkdir sonar-reports
fi

# 删除旧报告
if [ -f sonar-reports/"$myscheme"_oclint.xml ]; then
    rm -f sonar-reports/"$myscheme"_oclint.xml
fi

# 分析编译数据
maxPriority=15000
# Disable rules
LINT_DISABLE_RULES="-disable-rule=LongClass \
-disable-rule=LongLine \
-disable-rule=LongMethod \
-disable-rule=LongVariableName \
-disable-rule=ShortVariableName \
-disable-rule=HighNcssMethod \
-disable-rule=DeepNestedBlock \
-disable-rule=TooManyFields \
-disable-rule=TooManyMethods \
-disable-rule=TooManyParameters \
-disable-rule=IvarAssignmentOutsideAccessorsOrInit"

oclint-json-compilation-database -- \
-report-type pmd -o sonar-reports/"$myscheme"_oclint.xml \
-max-priority-1=$maxPriority \
-max-priority-2=$maxPriority \
-max-priority-3=$maxPriority "$LINT_DISABLE_RULES"

if [ -f sonar-reports/"$myscheme"_oclint.xml ]; then
    echo "分析完成"
else
    echo "分析失败"
    exit 0
fi

sed -i '' 's/\&/\&/g' sonar-reports/"$myscheme"_oclint.xml

# 生产配置文件
rm -f sonar-project.properties
cat > sonar-project.properties <<- EOF
sonar.projectKey=$1
sonar.projectName=$1
sonar.projectVersion=1.0
sonar.language=swift
sonar.sources=.
sonar.swift.simulator=platform=iphoneos,OS=latest
sonar.swift.project=$myworkspace
sonar.swift.appScheme=$myscheme
sonar.swift.appConfiguration=Debug
sonar.sourceEncoding=UTF-8
sonar.swift.excludedPathsFromCoverage=.*Tests.*
sonar.swift.tailor.config=--no-color --max-line-length=100 --max-file-length=500 --max-name-length=40 --max-name-length=40 --min-name-length=4
EOF

# 储存到 sonar 数据库
/bin/sh sonar-scanner -X
脚本源码
脚本源码已放在 Github 仓库 https://github.com/muzipiao/dev-shell 的 sonar-scan 文件夹下,组件 Git 路径和拉取到本地的路径有所不同,需要简单修改,这些脚本供学习参考。
如果您觉得有所帮助,请在GitHub Shell上赏个Star ⭐️,您的鼓励是我前进的动力。
参考
- https://blog.csdn.net/weixin_43901866/article/details/86578648
- https://www.jianshu.com/p/3b70aa6af07b